Perhaps you’re cultivating a mediation practice, or perhaps you just have a passion for beautiful gemstones and intentional jewelry but either way learning how to craft your own hand-knotted mala allows you to fuse your energy into a loving and supportive sacred object. A lot of malas in today’s marketplace or made with elastic rather than being hand-knotted and although this is appealing to the maker, as it significantly reduces the construction time and is often sold under the guise as being “more adjustable” to your wrist, there’s a part of me that sighs with the watering down of something sacred into something commercially viable. The beauty of crafting your own mala lies not only in the cultivation of your own custom sacred object, but also in the meditative and devotional aspect of infusing it with our love, time, and attention. Like the Tibetan monk ritual of crafting sand mandalas only to sweep them away once they are completed, the value derived is in the energy and practice of presence and non-attachment which gives the ritual potency, not the result. Here we will be fusing the benefits of the creation itself with a beautiful mala made just to your liking, which can support you in daily wear or a meditative practice.
Before you begin you’ll want to visit your local bead shop or shop online for gemstones, ceramic or wood beads that appeal to you. You can either shop by intention, discovering the properties of gemstones tied to the qualities you are cultivating or simply allow your intuition to guide you. Is there color you feel attracted to or are you more practical and want to choose something versatile? Below you’ll find a short list of popular gemstones and their qualities, as well as a complete shopping list of what you’ll need to complete this project.
Popular Gemstones and Themes:
Love: rose quartz, green aventurine, rhodonite, or rhodochrosite
Grounding: Onyz, black quart, hematite
Communication: Amazonite, or aquamarine
Clarity: Clear quartz, amethyst, and tiger’s eye
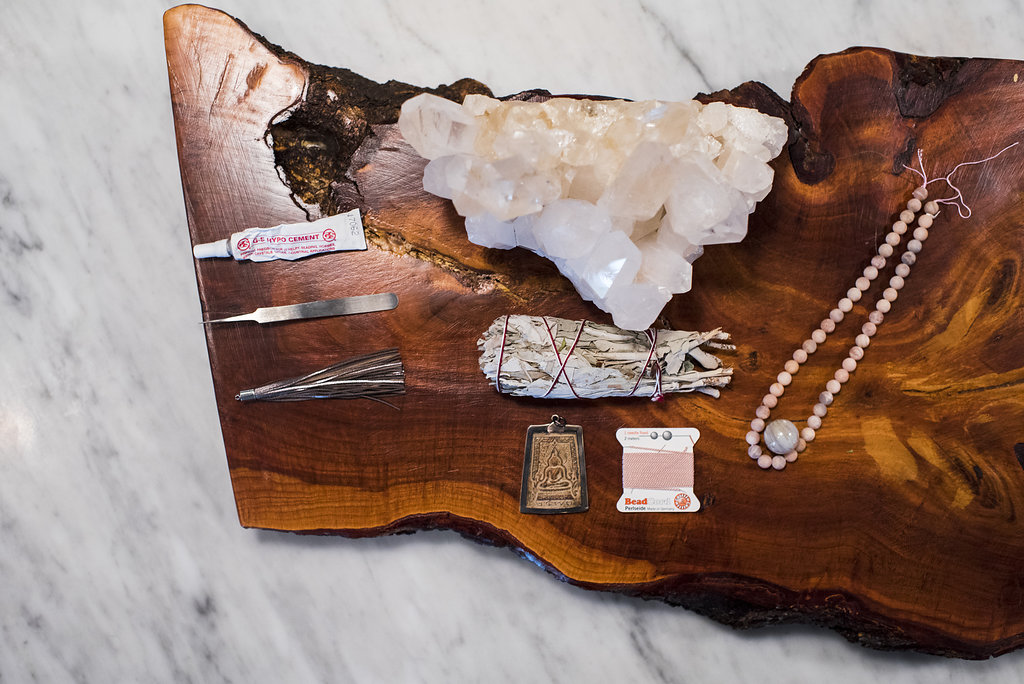
Shopping List:
· 108 – 8 MM Beads (you can use really any size you like but this is the most typical; you will need to adjust the thread size to the bead. This shopping list is based on the 8mm size). These can be all the same or mixed. Ceramic or wood beads can be a nice inexpensive option to gemstones if you’re on a budget.
· Optional beads such as spacers or decorative elements may be added for aesthetic purposes. In general, you would not want these beads to be the same size. When repeating your mantra using your mala beads you would skip these beads and would want to be able to intuitively feel that these are not in the 108-count.
· A Guru Bead – This is a decorative single bead that is typically larger than your main mala bead. See notes below about the Guru bead.
· Tassle
· #8 thread with needle attached (easiest, however you can attach your own if necessary). Note: The thread size is VERY important. If you buy beads with a smaller hole, you will need thinner thread. However, if you buy thread that is too thin for your bead, your beads may move over your knots. Consult with your beads sales rep to make sure you are purchasing the appropriate size.
· Tweezers
· G-S Hypo-Cement Glue or fabric cement
· Bead Board (optional but inexpensive and very helpful).
Please note there are many different methods for constructing malas, this is what I’ve found most reliable.
Step 1:
After purchasing your beads, spread them out on the bead board crafting a design to suit your liking. The guru bead (usually a large decorative bead), followed by the tassel will be at the middle point of your beads. (44 to each side plus any spacers you may have added). Make sure to count that you have 108 beads total, not including the guru bead. Depending on the size of the beads you purchased this will make a LONG necklace. I usually double wrap mine around my neck when using the 8 mm beads.
Note: The guru bead represents your teacher and serves as a marker in a Japa meditation. Starting on the bead next to the Guru bead, slide each bead between your fingers repeating your mantra one time for each bead. Once you reach the guru bead you will have completed your mantra 108x bringing deeper awareness around your intention. This would signify the completion of your mantra, or if you choose to go another round flip the beads now and go back the other direction. You never cross or go over your guru bead.
Step 2:
Once you’ve finalized your design. You are going to tie a knot approximately 2.5-3 inches from the bottom. DO NOT leave too much string at the bottom or you will not have enough once you start tying off your beads. String on ALL your beads INCLUDUNG the GURU bead and TASSLE onto your string starting a couple beads to side of your guru bead (this way we can hide our final knot and glue in-between these beads, moving the pressure point away from the tassel. This method can be a little more confusing as you assemble the beads onto the sting but will save you a lot of heartache later by preventing any strain that may cause the tassel to fall off using other methods.)
Step 3:
Starting at the end with the knot, slide one bead down and place two fingers horizontally below the bead and behind your string. Wrap the string around your fingers and slip the other end (with most of your beads) through the hole like you are making a knot. BEFORE completing the knot and once all the beads are through the hole separate your two fingers slightly and place your tweezers on the string behind and connect it to your top bead. Press down and hold as you slide the knot up snug up to the bead. Remove your tweezers and grab the string on the outside of the knot, pushing it down until it is snug to the bead.
Note: this is the hardest and most crucial step to master in the whole process. If the knot is not snug there will be movement in-between the beads. It may be useful to purchase an extra string to practice getting the knotting correct before working on your actual piece. It becomes simple and meditative once you understand the process.


Step 4:
Repeat until you come to the end of the beads. This includes knotting the guru bead and sliding the tassel by. Once you’ve come to the end you are going to join the sides by sticking your needle back through the bead on the other end of the necklace and tying a knot on top of the existing knot. I like to repeat this on to the next bead and tie off two knots.
Step 5:
Using the cement glue place a small dot of glue on both sides of the knot and place to the side to dry. I usually wait overnight but you could cut much quicker if necessary. Once the knot is dry, trim off any excess string.
Congratulations you have completed your first mala!!
Need help choosing a mantra? We’ve got you covered! Discover 108 mantras or affirmations to hone your practice.